Sunday 31 August 2014

A treat for the last day of August....

 August 31st. Already. HOW did we get here so soon?! It's been a golden day....not hot, but warm with the leaves on the ripening tomatoes beginning to yellow and the other plants starting to look a little tired. I found these very ripe bananas in the fruit bowl. They spoke to me...and the words they said were 'banana bread'! How could I resist? I made 2 big loaves, but the recipe below has been written for 1...feel free to double up and freeze one, or - as I am doing - give one away to a neighbour!

Sugar Moon Banana Bread - loosely based on a recipe by the inspirational Ina Garten

3 large very ripe bananas
250g/2 cups rye flour (I devised this recipe for my Mum, who is wheat-intolerant although not coeliac. If you prefer, you can use spelt, wholewheat or simply plain white flour. I just love the taste of rye!)
1 tsp bicarbonate of soda/baking soda
1 tsp ground cinnamon
Big pinch of sea salt
50g/ 1/2 cup chopped walnuts (optional but lovely, I think!)
150g/ 1 & 1/2 cups light soft brown sugar - muscovado if possible
2 large free-range eggs
1 tsp pure vanilla powder or good vanilla extract
120ml/ 1/2 cup sunflower oil
120ml/ 1/2 cup full-fat Greek yoghurt....you could also use sour cream or creme fraiche of that's what you have...but don't use low-fat anything!

Preheat oven to 175c/350f
Line a 1kg/2lb loaf tin with baking parchment or a liner...

 ...comme ca!
 This is the rye flour I use, by the way...available in most supermarkets. I use it a lot because although rye does contain gluten, it has much less and is usually suitable for those with an intolerance to wheat.
Peel the bananas and break into the bowl of a stand mixer. Add the brown sugar...
 and mix, using the paddle attachment, until the bananas are properly broken up...they will never be fully smooth, but should be liquidy by now!
Add the vanilla - I use Ndali organic pure vanilla powder because it's Fairtrade and also absolutely gorgeous...
 but any decent extract will do, of course. Then add the oil, yoghurt and eggs to the bowl too...
 Mix again until well combined, then add in the dry ingredients, except the walnuts if using, and mix on the lowest setting just until combined. Remove the bowl from the mixer, add the nuts and stir in using a spatula...
 Pour into the prepared tin....
 it looks and smells divine by this point, with the little specks of cinnamon & vanilla clearly visible...
 Bake for approximately 1 hour...if you have a 'hot' oven, start checking after 45 minutes and rotate the pan if necessary to achieve an even bake. When done, the cake should be well-risen and golden brown...

 Remove from the tin and cool on a wire rack....
... although a barely-warm slice is absolutely irresistible....

Well, I certainly found it so! It smells almost alcoholic...probably the ripeness of the bananas...just beautiful. It freezes well for up to a month, or will keep for a couple of days if wrapped well - if it's warm where you are, store in the fridge.

I hope you make it and enjoy it....see you in September!

Thursday 21 August 2014

A Friendship Cake....

I met my longest-standing friend,Isobel, on my first day at a new primary school 42 years ago! Of course, the closeness of school years can't continue forever - those days when I would say goodbye to her on the school bus and then call her the minute I got home to continue our conversation....but we have been in each others lives in some way from that day to this. She and her husband, Brian, now run a successful & delicious crumble business based in beautiful Somerset - so our lives aren't so very different once again (although Isobel also has two young & gorgeous children to juggle!)

When she used to come to our house for tea, there was one cake that my Mum would bake that Isobel absolutely adored...& to this day my mother still refers to this as 'that cake Izy loves'! So, as the days are somewhat autumnal right now, I thought that I would reproduce the recipe here (with a few tweaks) in honour of our friendship. This one's for you, Is! xx

Blackberry Streusel Cake


For the streusel topping:
100g plain flour (you can use spelt/wholemeal if you have it)
80g butter
1 heaped tsp ground cinnamon
50g light brown muscovado sugar

For the cake:
200g self raising flour
100g light brown muscovado sugar
200g butter
3 free-range eggs
1 tsp baking powder
1/2 tsp ground cinnamon (optional - but I love cinnamon!)

About 250g blackberries (preferably picked from a sun-drenched bramble bush! You can use raspberries or blueberries too, if blackberries aren't in season)

Line a 23cm square pan with baking parchment.
Preheat oven to 175c

First make the topping; just place all the streusel ingredients in the bowl of a food processor and pulse until it forms large crumbs...
 tip into a small bowl & set aside. Without washing the bowl of the processor, add in all the cake ingredients (except the fruit) & whizz to a smooth, silky batter..
 It won't be too liquid as it needs to hold up the berries & topping! Scrape the mixture into the prepared pan and level the top roughly...
 then stud with the blackberries...you don't have to be too precise, but try & make sure that there's an even covering of fruit all over the surface...
 finally scatter the streusel over the berries...
 distribute it fairly evenly over the top...don't pack it down, and I think it looks lovely when a few blackberries show through the crumbs too! Bake in the preheated oven for around 45 minutes...the streusel will look golden brown, the middle will be slightly domed. You can test by pushing a skewer or cocktail stick into the centre & checking that no wet dough is sticking!
 Then cool in the pan on a wire rack...however, this is so delicious served slightly warm so feel free to cut it then and enjoy a slice...perhaps with cream?
 Store in an airtight container, or wrap in foil securely...it will keep in a cool place for a couple of days (not longer, as the fresh fruit will deteriorate.)
 I recommend eating a large square, with a big steaming cup of coffee,sitting in the August sunshine in a garden somewhere...if you are sharing with a friend, so much the better (it doesn't have to be Isobel, although she would be my choice....)

Enjoy! And now I'm back to the brownies...also delicious with friends! xx

Saturday 9 August 2014

What....no brownies?!

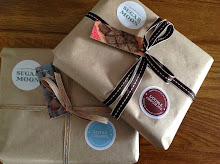
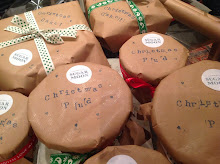
So, although life at Sugar Moon mostly consists of brownies...
 brownies....
 & yet more brownies...
 I do often bake other things...for the Farmer's Market, for friends or just for fun!
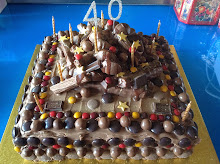
For instance, a good friend asked me to bake a big cake for a joint 65th birthday celebration for her parents....she wanted it to be both coffee & walnut and chocolate....be big enough to feed 30 and to have a nautical theme as her parents enjoy sailing.

I didn't want to create a tiered cake... for 30 people, I find that cutting squares is much easier. People (especially after a big meal) don't usually want a huge wedge of sweet stuff. So a rectangle fits the bill perfectly...but in two distinct flavours?

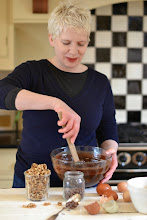
I got around it by making up the two cake mixtures at the same time (!) and pouring them into the cake tin almost simultaneously. I created a foil 'divide' to keep them separate as I poured, but took this away before baking...
 this was a big cake and took almost 2 hours to bake properly (a good tip that really works when you are scaling up a recipe is to lower the oven temperature and bake for longer...so the top and sides don't cook too quickly and leave a raw middle...)
 I liked the stepped effect of the finished cake....
 and then the decoration. I made a whipped white chocolate icing, which takes colour very well...this only needed a tiny teaspoon of royal blue paste but gave a great effect! The 'sand' is light brown sugar...
 which I adhered by brushing that portion of the cake with a sugar syrup..
 only the yacht, candles and shell are inedible. I was very pleased with the result...
and luckily so was our friend! I'll hear reports of the party later...

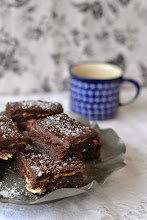
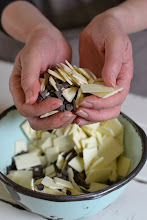
Meanwhile, I thought you might like a recipe? This is the Hazelnut & Fresh Apricot Cake that I baked for our recent Farmer's Market.
It was absolutely gorgeous....ideal, of course, with coffee or tea as a snack...but it would also be brilliant as a dessert with some creme fraiche or even ice cream I think. It will keep well for a few days, in the fridge (as the apricots are fresh ones) and will be even nicer the day after baking, when all the flavours have melded together...

Hazelnut & Fresh Apricot Cake

280g soft light brown sugar
270g ground roasted hazelnuts (I buy the skin-on ones, cheaper & fine for this recipe...& most others too! Simply toast for about 5 mins in a hot oven until golden and smelling very nutty! Then cool before grinding in a processor to a fine crumb)
50g ground almonds
50g fine semolina or polenta
75g self-raising flour
5 eggs (medium, free-range)
1 tsp ground cinnamon - optional but tastes lovely!
225g unsalted butter, melted and cooled a little
a punnet of apricots..(exact quantities don't matter for this but roughly 5/6 fruits. It also doesn't matter if they are slightly underripe as they are being cooked)

Preheat oven to 180c/160c fan/Gas Mark 4
Grease & line a 23cm loose-bottomed cake tin with baking parchment.

Simply mix all the dry ingredients together, then add the butter and eggs and mix well. I use my stand mixer for this, as there is quite a lot of mixture...but you could do it by hand with a wooden spoon, of course! Scrape into the prepared tin. Roughly chop the apricots, removing the stones (I actually just pull them apart with my fingers...I prefer a rustic look for this cake. You could slice them and arrange them evenly in a pattern if you'd like it to look more formal) and scatter or place gently over the surface of the batter. Don't push them in, the cake will rise around them beautifully.

Bake for about an hour, until it's golden brown and slightly pulling away at the sides. Check it after 45 minutes and rotate the tin in the oven if you need to, to ensure even baking.

Cool in the tin on a wire rack, then push up the bottom and remove the lining paper from the sides and bottom before transferring to a serving plate (run a palette knife under the base to help remove the base paper.)

Enjoy it...and have a wonderful weekend!